Profilo colore photoshop


Photoshop tutorials

- ITA -
Una volta modificate le nostre fotografie preferite con filtri e livelli di ogni tipo, è chiaro che il passo seguente sarà passare alla stampa e ammirare i nostri capolavori magari appesi in soggiorno con una bella cornice.
Prima di fare ciò, però, si devono considerare alcuni aspetti che ci aiuteranno ad eseguire una stampa professionale, dovremo considerare la gestione del colore in photoshop.
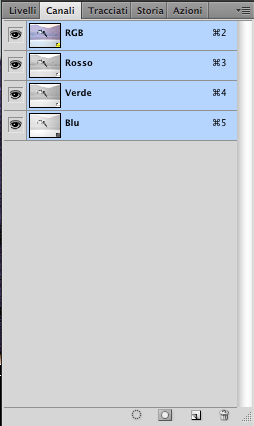
Ogni volta che apriamo una immagine sul desktop, avremo contemporaneamente a disposizione vari canali dedicati ai colori RGB. Ciò vuol dire potremo selezionare separatamente la luce di colore rosso, quella di colore verde ed infine il blu.
La differenza con i colori stampati è che quest'ultimi vengono creati con una combinazione diversa da quella appena descritta. Essi, infatti, sono composti da cyan, magenta, giallo e nero o più comunemente chiamati CMYK, colori di quadricromia.
Per farla breve, senza annoiare nessuno, dirò che a seconda del modello di stampante o del tipo di setup eseguito sul vostro monitor si avranno delle differenze sostanziali fra ciò che vediamo sul desktop e ciò che realmente andremo a stampare ed è evidente che questo rimane un problema fondamentale da affrontare. Ora è molto chiaro il perchè molte volte dovendo portare immagini digitali ad un laboratorio fotografico, questo ci liquiderà con la prima stampa ottenuta magari con macchine automatizzate, ottenendo così un risultato privo di colori e nitidezza originali.
Non preoccupatevi, la soluzione c'è ma si devono chiarire alcuni aspetti.
E' possibile creare dei profili colore adeguatamente personalizzati per ogni tipo di stampante in modo tale da poterli utilizzare con le nostre fotografie. Cosa importante è calibrare il nostro monitor, questo è un procedimento che sicuramente riuscirete a svolgere o da pannello di controllo in Windows o da preferenze di sistema in MacOsX.
Vediamo, in questo primo tutorial dedicato, come impostare la gestione del colore:
Selezionando Modifica -> impostazioni colore si aprirà una finestra relativa a questo tipo di opzioni
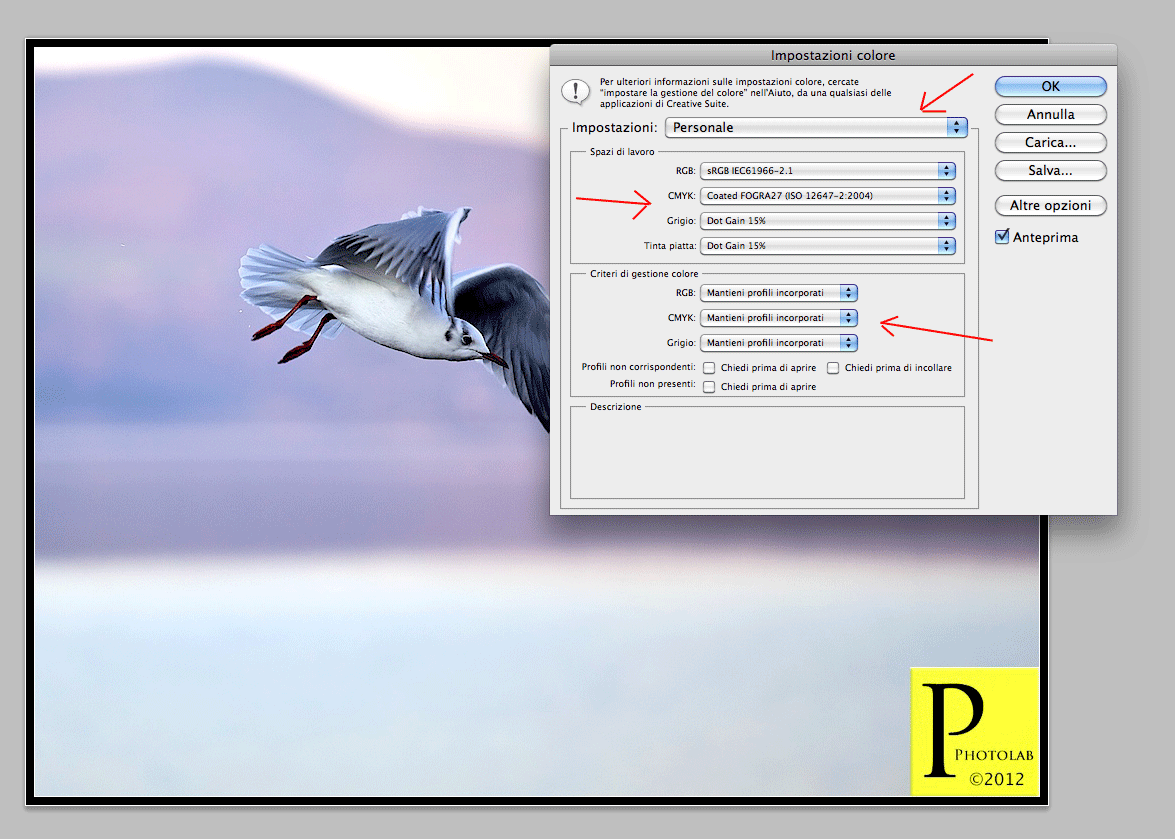
E' evidente che possiamo eseguire ogni tipo di impostazione riguardante la gamma e la gestione del colore desiderato. Proviamo per ora ad eseguire una "prova colore" cliccando su
Impostazioni -> Prestampa Europa 2
Potremo notare come le varie opzioni al di sotto di tale finestra si siano automaticamente adattate con
RGB: ADOBE 1998
CMYK: Coated FOGRA27
ecc.. ecc..
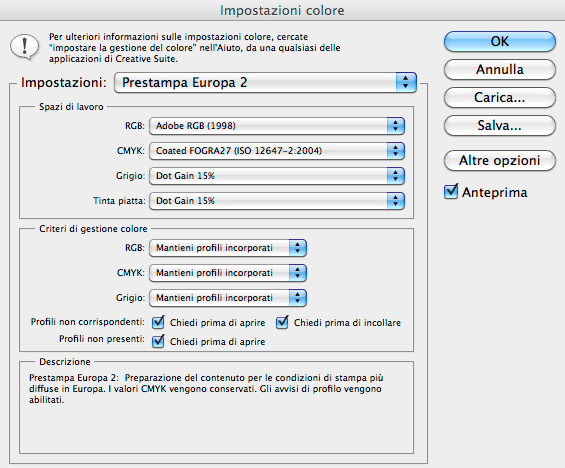
Clicchiamo su ok e selezioniamo a questo punto Visualizza -> Imposta prova -> Personale
cercando di stare bene attenti a selezionare l'opzione anteprima sulla finestra che comparirà.
A questo punto dal menù a tendina "dispositivo da simulare" dovrete scegliere un profilo che identifichi il tipo di stampante che state usando. Questo naturalmente lo dovrete accertare consultando le specifiche di tali strumenti.
Se la cosa vi risulta difficile allora provate con CMYK di lavoro - Coated FOGRA27.
Deselezionate, in caso, la casella "mantieni valori numerici" e dal menù "intento di rendering" selezionate "colorimetro relativo". Ciò sarà fondamentale per convertire da RGB a CMYK in maniera ottimale!
Infine se possibile selezionate le caselle "simula inchiostro nero" oppure "simula colore carta" e fate click su ok.
Vedrete che l'immagine avrà sicuramente cambiato aspetto, in quanto photoshop vi sta, appunto, simulando ciò che presumibilmente otterrete con la vostra stampante.
Sta a voi ora modificare queste opzioni per trovare il profilo colore migliore per le vostre esigenze.
La storia non finisce qui però, c'è ancora strada prima della stampa vera e propria, impadronirsi di queste scelte è fondamentale.
Buon lavoro dunque!


- ENG -
Once you have modified our favorite photographs with filters and all kinds of levels, it is clear that the next step will be go to the press and admire our masterpieces maybe hung in living room with a beautiful setting.
Before doing so, however, you should consider some things that will help us to run a professional printing, we will have to consider color management in photoshop.
Every time you open an image on your desktop, we will simultaneously provide various channels dedicated to RGB colors. This means we can select separately the red light to green and finally blue.
The difference with the printed colours is that the latter are created with a combination different from that just described. They are composed of cyan, magenta, yellow and black, or more commonly referred to as CMYK process colors.
To make a long story short, without boring anyone, I will say that depending on the printer model or type of setup runs on your monitor you will have substantial differences between what we see on the desktop and what really will go to print and it is clear that this remains a key problem to be addressed. It is now very clear why many times having to bring digital images to a photo lab, we will settle with the first printing produced perhaps with automated machines, thus obtaining a result lacking in sharpness and colour originals.
Don't worry, the solution is there but you need to clarify certain aspects.
You can create custom color profiles properly for each printer type so that you can use with our photos. Important thing is to calibrate our monitors, this is a procedure that definitely will be able to carry out or control panel in Windows or Mac OS X system preferences.
See, in this first tutorial dedicated, how to set color management:
By selecting Edit-> color settings opens a window for this type of options
It is clear that we can perform any type of setting on the range and color management. Let's try for now to run a "proof" by clicking on
Settings-> Prepress Europe 2
We can see how the various options below this window will automatically be adjusted with
ADOBE RGB 1998
Cmyk: Coated FOGRA27
etc.. etc..
Click ok, and then select view-> proof Setup-> Staff trying to become careful to select the preview option on the window that will appear.
At this point from the drop down menu "device to simulate" you choose a profile that identifies the type of printer that you are using. This of course you will need to determine the specifics of these instruments.
If it is difficult then try working-CMYK Coated FOGRA27.
Clear, in case, the box "keep numbers" and the rendering intent menu "select" relative "colorimeter. This will be essential to convert from RGB to CMYK optimally!
Finally if possible select the boxes "simulates black ink" or "simulate paper color" and click ok.
You will see that the image has certainly changed appearance, because photoshop is, in fact, simulating what presumably get with your printer.
It's up to you now edit these options to find the best color profile for your needs.
The story does not end here, however, there is still way before the actual printing, take these choices is critical.
Good job!

